There are many steps to take in order to achieve the best results with your floor restoration project. First, you should plan the job well. You can either get a floor restoration contractor to oversee the restorations or do the work yourself using simple hand tools. When it comes to sanding, do not simply scrape away the scrap wood and take out the old flooring. The floor restoration sanding process will cause damage to the surface of the flooring underneath so you must leave as much of the old surface exposed as possible.
You should make sure that you wear a dust mask and goggles when refinishing wooden floors. In addition, you should use an appropriate type of wood dusting compound so that you don’t accidentally inhale any of the wood dust that will be distributed throughout the room. If you are unsure about the proper dusting substance to use then ask a local hardwood floor restoration company for recommendations.
 The next step in a successful wood floor restoration project is to remove all furniture from the room. Most homeowners feel that this is a no-brainer, but many are surprised to learn how difficult it actually is to completely remove all furniture from a room without ruining the surface underneath. Many hardwood floors have intricate etching on their surfaces and if you chip a corner of one of these you can be almost certain that the whole floor will become damaged. Leave all of the furniture in the room, even if it is slightly damaged, so that it can be pulled out and replaced in the near future. Leaving furniture in place will also save you from spending valuable time restoring the room to its previous appearance.
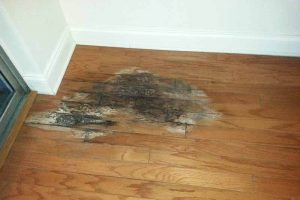
One of the most important things to remember during a wood floor restoration process is that you should never apply any type of varnish or coating to the floor prior to floor sanding. Wood floors are easily stained and the wrong stain can affect the way that you see the refinishing project later. If you do happen to stain the floor while it is still wet, make sure to let it dry thoroughly before applying any type of sealant. The best advice is to leave your wood floor restoration process to the professionals as they are able to make the most of their skills by honing and sanding each piece to perfection.
Many homeowners tend to think that all you need to do to get a beautiful looking floor is to stain it or coat it with a protective coating, but that isn’t the case for all types of floors. Some floors, such as ceramic tiles and vinyl flooring, require a different kind of hardwood floor restoration process. In these cases you will need to use floor sanding equipment to carefully grind away the years of grime and stain from your floors. While you may think that sanding hardwood floors is inconvenient, it can actually help to protect the floor’s surface. If you want to avoid having to sand your floors down, make sure you also give your floors a light polishing with car wax or floor sanding paste.
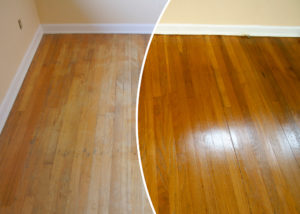
There are many homeowners who don’t know how to properly treat their hardwood floors and are at risk of causing damage to their floors through improper maintenance. In order to keep your wood floors looking like new, you need to learn how to properly treat your wood floors. Hardwood floor restoration is something that you should consider hiring the #1 floor restoration service Houston, TX to do in order to ensure that they get the job done right. Don’t be left in the dark regarding how to maintain your wood floors; make sure you learn everything possible about wood floor restoration processes.
 Although this can be a frequently asked question, the simple answer is: Yes, kitchen cabinet refinishing and refacing does work! In most cases, it is faster than installing new cabinets; however, there is sometimes more cost involved. This is due to materials costs and labor costs associated with installing new cabinets. There are some instances, however, where it is almost free or very inexpensive. For instance, with kitchen